June 13

Resource Feature: Multiple choice marking software

Last year my school invested in  Remark OMR Software (Optical Mark Recognition) in order to improve students multiple choice responses. Some HSC subjects take 20% of their mark from multiple choice, so although it is important to have students write well for the short answers, and for extended responses, it is also important to give students practice in all types of questions that they will get in their examinations.  Remark also includes a feature to generate reports which give an item analysis which allows teachers to address common misunderstandings of content. Screen Shot 2015-06-14 at 10.19.28 am
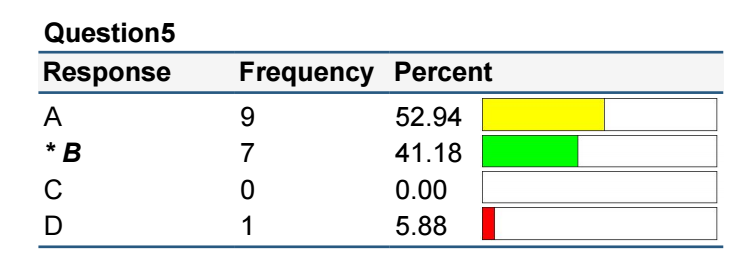
For example, the question 5 graph at the right of this paragraph shows a section of the report generated from Remark. This allows me as a teacher to go back and look at distractor A and explain to students why that was not a correct answer. In the case of this question, more students actually got the question incorrect. Since my exam only has 10 multiple choice questions, I used to do this same thing with a pen and paper tally sheet, and graphs in keynote. However, the software helps to save time in the generation of reports.  This is where the power of this software really comes in. It not only saves time, but adds value to the feedback to students.

ZipGrade Cloud is an IOS and Android app that allows you to print off answer sheets, and then use your phone to scan students responses. The beauty of this is that every teacher in the school can have access to it, and do it in class so that students get instant feedback.  Unlike other digital versions such as Flubaroo, or Socrative, teachers don’t have to pre-prepare anything, they can use already existing exams (such as past HSC exams), and keep copies of answer sheets in your drawer.  The answer sheets, unlike Remark, don’t have to be specific to the exam that you are running. The workflow is basically, students sit the exam, then you set up a new exam on your phone, scan the sheets, and generate the results. This doesn’t create the pretty graphs that Remark does, but you can export to CSV and then create the graphs yourself in Excel. The cost difference between this and the Remark system is substantial. The ZipGrade app is free for 100 scans to try out, then they have a variable pricing structure, where you can purchase for either 2 months ($2) or a year ($7). If the school was considering a Volume purchase, they can purchase the app for $10 with no recurring charges.

Aside from answering paper based multiple choice responses, there are also a number of web based tools and apps available that are student response clickers.  Socrative, KahootPoll Everywhere, GoSoapbox and E-Clicker are all systems that allow students with individual devices to respond to a question with then immediate feedback to the teachers. Each of these use different devices and systems. For example, PollEverywhere uses SMS technology, whereas Socrative and E-Clicker are apps. I particularly like E-Clicker, as there is also a computer version for the teacher, so that you can create quizzes on your computer (so much easier to type than ipad). These are all reasonably priced (under $10), or free for teachers, and all are free for students.

Screen Shot 2015-06-14 at 11.28.50 am
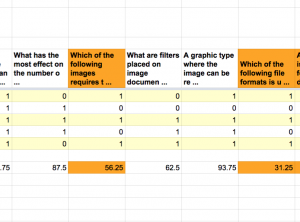
Finally, if you are a Google Fan, you can create a form in Google forms, which is easy to do, but does require some preparation. I created this one, by looking back through old exams that I had constructed, and copying and pasting across. The good thing is, if you have a list of bullet points, it will allow you to paste into the google form with every point then becoming another option. Once you have answered the form yourself, then you can run an add on for Google Docs, Flubaroo, in order to get it to automatically mark your responses, and then email students their feedback, straight away. It also generates you a spreadsheet, which highlights questions that are worthwhile going over with with students. (see right)

The power with all of these systems are the analytics provided. This gives you the opportunity as a teacher to determine where are the gaps in your student knowledge, and then to design differentiated learning activities in order to address those gaps. There is also the added benefit of giving teachers feedback on construction of multiple choice questions, including appropriate development of distractors.


May 30

Best Pen Tool Tutorials

The pen tool is my favourite tool in illustrator, and once learned, gives you the awesome power of a superhero computer user in lots of other programs such as photoshop and after effects. 
 
My favourite tutorials are here: 

Posted from Diigo. The rest of my favorite links are here.

May 26

Weekly Links

Posted from Diigo. The rest of my favorite links are here.

May 24

Study Apps

As we build up for the HSC Exams, I’ve been reviewing my app library to send to teachers and students the  apps that will help out. Don’t forget Socrative:https://itunes.apple.com/au/app/student-clicker-socrative/id477618130?mt=8(Free student version) and Teacher Version (https://itunes.apple.com/au/app/teacher-clicker-socrative/id477620120?mt=8)  This is a student response system where you can create quizzes, etc for students that they have to answer in class (self marking!)

For more detailed type questions: Eclicker https://itunes.apple.com/au/app/student-clicker-socrative/id477618130?mt=8 (Teacher Version…expensive at its almost $20 mark, but a one off purchase) and Student Version (free) https://itunes.apple.com/au/app/eclicker-audience/id520556451?mt=8

Explain everything is simply my favourite teaching app. This app is essentially a whiteboard app that allows you to record, however, you can also download images, pdfs or power points while you annotate and “talk to” them. A how to guide is here: http://www.morriscooke.com/?p=1045. One thing you can do while you are marking exams, is take a photo of student responses with your iPad, then use explain everything to give additional feedback (eghttps://www.youtube.com/watch?v=7KCtKhvlHbo).

Popplet is a brainstorming tool that is available https://itunes.apple.com/au/app/popplet/id374151636?mt=8 . This is a good app to show connections between concepts, or to do a summary of a topic.

Brainscape is a flashcard based app, but students can actually collaboratively edit the deck that you create. Students then study, and self-rate their confidence on each card. The app then uses a formula, based on brain research, that throws back the cards that students remember least in a patterned basis that is best for them to remember them. You can then view students statistics and ratings on the brains cape website. https://www.brainscape.com/ We run it as a competition…who has studied the most.

Self Control is a great mac app that will stop notifications from pushing to your computer, to help with those moments when you have to study (or finish year 9 reports) and just can’t stop hitting the “Reply” button when you get an email, leading to a task taking four times as long as it should. http://selfcontrolapp.com/

Category: Apps | LEAVE A COMMENT
September 11

Sample Blog Post for Industrial Tech

Yesterday, in multi I worked through editing my kinetic typography for my website. I was working through my own animation, while watching the Crooked Gremlins tutorial below

Kinetic Typography Tutorial from Elrond Hubbard on Vimeo.


One problem that I faced was trying to make sure that the audio matched up to the video. I solved this problem by showing the wave form on the layer with the audio on it. This allowed me to time the areas of silence, and to move the individual layers to this section.

Next lesson, I want to move to trying to implement different layouts within my typography, so that it looks less like plain motion tweens. The following is an example of that:

In regards to my timeplan, I seem to be a little behind (ie, about a period or two). I will need to do some work over the weekend to catch up with my time plan. The following is a short sample of where I am up to at the moment.

Next step: Experiment with different layouts in illustrator to import into After effects for my typography.

June 19

Stephen Ritz: New Technology Syllabus, GreenBronx Machine

photo

Yesterday, I was lucky enough to hear Stephen Ritz speak at PBL world about the work that he had developed with the Green Bronx Project. Stephen is a highly engaging speaker, and talked about starting a small project in the a high school in the Bronx in New York to grow indoor vegetables. This small project evolved into a large scale business, installing and growing indoor and outdoor gardens that have turned into public art…beautifying the urban area, increasing the health of the students and increasing school attendance from 40% to 93%


If you haven’t heard him speak before, take it from me, watch his TED talk. Now.


This area was statistically the poorest area in the state, and this meant that students were taking home grocery bags of fresh fruits and vegetables for their families.  It has also opened conversations about the types of food that people eat, increased the health of the students, but also given them the ability to grow food cheaply within their own homes. They also had cooking lessons, with the food harvested from the garden used within the recipes, so that students learnt to grow and then cook healthy, cheap food.   This has the potential to change their whole cycle of unhealthy eating within poorer areas.   When these were growing, he then realised that they had way too much, and then scaled up production to increase the quantity so that the school canteen, and then the local community could buy their produce. This was all driven by the students, who were choosing the types of vegetables, doing the planning, finance, marketing, sales and production within the business. He gives the example where they produced for a while only green capsicums. Then, students went on an excursion to the markets where they saw that you could get different colours of capsicum and that red and yellow capsicums were worth a lot more money. From then on, they never grew green capsicums again. If you have a look at the photos, it shows the scale of the production. They then moved on to installing gardens within other areas, hiring themselves out to business where they have essentially created public art space. Within NSW, this seems to be a great context for senior Business Studies, Design and Technology and Industrial Technology.

GBM-GrowingHealthyJobs


Obviously, you can see links for all types of subjects here, which is why I think this is a great project that crosses so many Key Learning Areas. Health, Food tech, Science, Geography, Maths, Technology…but schools as a TAS teacher, at the moment, what I’m worried about most is the new National Curriculum (cue scary music) in Technology, which seems to, from my understanding, require a compulsory agriculture strand. Most schools will have serious issues with this. Firstly, the space to work this in. Secondly, the knowledge to actually make the gardening, etc, work. However, in Stephen Ritz’ own words “Be the conductor of an orchestra where you can’t play an instrument”. The kid’s research should be around the types of plants to grow, what to put them with in order to reduce pesticides, when best to harvest and sell plants, even what types of plants to grow based on research collected.

This is design at it’s finest! Entrepreneurial activity where students can make money and participate in a real world activity. I’m already scoping out areas of the school for my year 11 Industrial Tech class.

June 5

Excel 101: Starting with Spreadsheets

Parts of a Spreadsheet

Watch the following video looking at the basic parts of a spreadsheet.

Key ideas:

  • A column is the part of a spreadsheet or table going down the page. This is indicated by a column header that is a letter (eg, A, B, C)
  • A row goes across the page, and is indicated by a number (1, 2, 3)
  • A cell is the intersection of a row and a column, where data is stored. This is referred to by its cell address or cell reference. (eg, A1, B3, G5)
  • Cell references are used within formulas.

Rows and Columns

See if you can figure out the cell references from the following image:

Guess the Cell Reference

Basic Formulas =B1+B2

Key ideas:

  • All formulas start with an equals sign =B1-B2
  • You can click on the cells to enter their cell reference in the formula.
  • You can copy down formulas and they will copy the cell references down (these are called relative formulas)
  • Any simple mathematical function can be used within a spreadsheet =B1+B2, =B1-B2, =B1/B2, =B1*B2 (multiplication) , =B1-B2+3*B4-B1/2

More advanced formulas

Key ideas:

  • There are a whole heap of pre-defined formulas. Some examples are =Max() =Min() =Average() =Sum()
  • You can refer to a range of cells from the top left to the bottom right cell: eg:


 Range of Cell References


Absolute and relative Cell References

Key points:

  • Relative cell references are references that are relative to where the answer is: ie, typing in =b1 in B2 actually just means “the cell directly above me”
  • Absolute cell references are absolutely where you say that they are. ie, if you type in =$b$1 in the cell, it means: “no matter where you move me to, always equal what is in B1”
  • This is an advanced technique that you can use with things like the Rank() formula.


Category: IPT | LEAVE A COMMENT
November 17

Online “Pinning”

For quite a few months now, I’ve resisted the pintrest craze. Of course, like every new web app that comes out, I can’t help myself but to go online and sign up for an account. Of course, sometimes I use the account for all of five minutes, and then realise that nothing that I’m doing quite at this moment fits in with what the system does. That was me with Pintrest. I’ve sat back for the last few months slowly, as I’ve seen other people using it coming around to the idea that it might be kind of cool. For collecting pictures, or web links.  Or curating ideas. Great.

So today, I had to put together a list of tutorials for my year 11 Industrial Tech class for next year. They don’t know it yet, but we’re going to be designing a short animation, for placing before a movie, like the samples here. What I really need them to know is after effects. And rather than having a list of tutorials, I thought it might be good to create a concept board of different places that they could go. Like many other things, like recipes, and my to-do list, Pintrest has been rolling around in my brain for a while and I thought that this might be the time that I pull it out.

To my credit, I spent about an hour or so, after re-loggin in, looked shamefully at my two things that I had pinned since drawing, and with excitement created four or five boards for stuff that I’m currently curating….ipad apps, elearning websites, and of course, my after effects tutorials. I installed the “Pin it” button on my browser, then spent some time reorganising my links, realising that if I could pin stuff, I could then delete some stuff off my favourites. Now don’t get me wrong, I’m an avid delicious user for my links, and since Alan November came out to our school to talk to staff in September, I’ve been importing all my links over to Diigo (okay, I haven’t touched them since). But what I really wanted was something visual.

It took me about an hour and a half to realise that Pintrest is still not for me. Firstly, there seems to be no customisation of how it looks. Rows and rows of images, I’m sorry, are in no way inspiring. Then, as I tried to pin stuff, I realised that the only thing that you can really pin is images. And some websites that do have images, are just advertising, so it looks like you’re pinning a whole heap of advertisements together for people to look at.  Yes, it re-directs back to that site, but if the original site that you want to bookmark doesn’t have any images in it, it won’t pin it. What type of site doesn’t have any images, you say? Well, actually, a lot of images are now loaded through CSS or javascript….or anything that is run by a programming language. Or websites that are video tutorials. So, you actually can’t pin anything that doesn’t have an image in it…and most of these things are those things that are highly interactive, which is the kid of stuff that I’d want to pin.

So, I needed a different solution. I checked my trusty google and found some other options:

ZooTools was pretty good, it worked easily. An easy sign up process and a nice interface. More importantly, you could save pages that didn’t have any images. I spent some time playing around with this and came up with a half decent collection. I have of course, now discovered that I am extraordinarily picky and didn’t like that you had to click on the image to see the link, and then click onto the “referrer” in order to get to the website. Most of my kids aren’t going to realise what that means. It does however, look quite nice, and embeds well, which was another of the requirements that I had floating around the back of my brain.
I then checked out Larry Ferlazzo’s blog post about Online Virtual Corkboards. I ruled out his first suggestion, Wallwisher, straight away for what I wanted. Wallwisher is a fantastic resource where you can share a wall and get student input on questions, thoughts, etc. I use it quite a bit in my teaching, but it wasn’t quite what I wanted in terms of posting links. Essentially, I decided, that I wanted a created website where I could add post it notes for comments, where it looked well designed, I could post what I wanted, and change images and descriptions.

CorkboardMe had potential, but then it said I couldn’t embed videos. Although I dont’ really want to do that now, I do want something that was going to go the distance, and expand with me when I wanted to try something else. So I didn’t actually even try that out. I’d love to know in the comments whether people had tried it or not.

LinoIt was my next experiment, and I quite liked that, but again…I quite liked the look, but it didn’t really do what I wanted.


My next experiment was with Mural.ly. And here is where I finally hit the jackpot. It was easy to do. IT really looked, when I pinned something, like I had taken a polaroid and thrown it on a table, which was pretty much exactly what I wanted. You could move, resize, rotate, and change the pictures that were pictured in the preview, and even add pictures that were not on the website. Or, if you didn’t have any pictures on the website, you could post the link without a picture, or do what I did with the creative cow link below, and just grab a related picture from somewhere else (of course being careful to ensure that you’re not breaking copyright. I then realised that I could add notes with sticky notes, stickers to make it look cooler, or to emphasize different things, and even embed.

There is also a great feature called “spaces” which has some interesting templates. I think I’m going to use the calendar for my next Project planning meeting, so that I can put notes or links with checkpoints within the projects listed on them. This way, all project planners could collaborate in the space. As I’m writing this, I’ve also just realised that there’s a Prezi-style frame feature where you can guide people through parts of your corkboard in order to follow a sequence, an option to drop google docs onto it AND an integrated google image search. I’m alot more impressed with this. See the finished pinboard here


February 5

Video recording for student learning

You’ve had a fantastic lesson, including a demonstration that is essential to students’ understanding of the content. Wouldn’t it be great if the students could take home your explanations of content, or demonstrations so that they can listen to you over and over again? Students use iPods now as an extension of themselves and we worry and curse about how often they have earphones in. If we could access that tool in order to get students to study, in a way that is both visual and audio, in a quick and easy way, this must surely lead to greater success in retention of information. There are now a number of methods to do this through the use of easy to use video tools: You Tube, screen casting, document cameras and Powerpoints.This video combines all three as a sample:
Sample
In the interest of practicing what we preach, all of the following has been recorded and placed on YouTube. You can access the pre-recorded demonstrations and all the following links by going to http://www.shortcomp.edublogs.org/STANSW
There are a number of examples on science demonstrations on You Tube that can be used within the classroom, for pre-reading or homework activities that get the students to visualize what should be happening as well as reading it. Students can be asked to watch a video as a precursor to what will be happening in the classroom, and asked to take notes on observations that they made during the video, questions that they had or can be asked an exam style question that requires them to analyse the information presented within the video.
Some examples that already exist on the web:
• Dr Carlson
watch?v=mNM5tHou4IQ
• They Might be Giants (who can forget the elements song)
They Might be Giants
http://www.youtube.com/user/ParticleMen
• Steven Spangler Science
Steve Spangler
Screen casting is a useful tool for showing content that is available in digital form. This allows you to essentially videotape anything that is shown on the screen. This is particularly useful when doing demonstrations of software, but can also be used to model writing skills within a word document, or by recording your interaction with programs such as Google earth, where you can point out particular land features or even just explaining an assessment task. This means that not only do all students across a year group get the same message, students can be just-in-time learners where they can access the content when they need to know, which makes it more relevant for their learning. These are also good when there are common misconceptions about a topic you can explain, or questions that are repeated from a number of students.
There are a number of tools for screencasting that are freely available for both Mac and PC users. Jing is the most common, which is a free downloadable program, but this limits the recording to five minutes. It is, however, very easy to use, and simple to install. The process of using Jing has been recorded and published on You Tube.
Screencasting Jing
Other programs include Camtasia for Windows, Screenflow for Mac (my personal favourite, because it allows you to edit in screen) or even just Quicktime, which has a new recording feature.
Document Cameras are a form of webcam that plugs into your computer to allow you to record yourself writing and drawing on paper. This is similar to an overhead projector that you can either project on the wall while you are in class, or pre-record. This is very useful when it comes to doing things like drawing mind maps, diagrams, solutions to problems (exams, homework), annotation of documents or focusing on writing skills for literacy. You can also use these as a macro lens for viewing very small items on a large screen for close ups when the class is previewing items. You can use any web cam for this task and make your own tripod, or purchase one for a classroom, but the most economical and portable way to do this, is to use a Point-to-view camera (link). This will cost you about $80 (link) and comes complete with a mini tripod that allows you to direct the camera directly at the page that you are writing on, plug the camera in and record directly using software such as Quicktime.
watch?v=28bN9k_qHOY
Powerpoints
You can capture a lecture given, either prior to the lecture or in class. An example is…. This is very easy to do, particularly if you have a mac, using keynote. When you play the keynote, instead of going to Play→Play Slideshow, you run the slideshow by going to Play→Record Slideshow. This will record your timing and progression through the slideshow and also your voice as you speak during the lecture. When you have finished, you simply go to File→ Export and use the settings on Image 4. The full process has been recorded and available on the link above. If you are using Powerpoint, the process is exactly the same, except instead of File–> Export, you need to go to file–> Make Movie.
Keynote recording